Turn Cash Into Crypto With Centralized Exchanges
 |
| By Beth Canova |
Our Weiss Crypto analysts have covered why they’re excited about 2024. And for good reason! It is shaping up to be an impressive year.
And we want to make sure you don’t miss a moment.
That’s why, as a special holiday treat this year, we’re taking a step back to make sure you have the tools and knowledge needed to navigate the crypto market like a pro.
Each day, I’ll walk you through a different process that will help you be able to take advantage of what crypto has to offer.
Starting with the very first step: onboarding.
The biggest hurdle for most investors coming from TradFi is how to enter the crypto space.
That’s where centralized exchanges come in. These are platforms owned by a central organization that facilitates the trading and swapping of crypto assets. Because they are centralized, they are beholden to the financial regulations of whichever country they operate in.
This allows for some traditional consumer protections, which many investors appreciate. The trade-off, however, is that centralized exchanges are more vulnerable to hacks due to the lack of decentralization as a security feature.
Additionally, bad decision making from the firm behind the exchange could lead to severe repercussions, as was the case with FTX in 2022. And if you hold your crypto on that exchange when things go south, you may not be able to get it out in time.
It is for this reason that we do not recommend storing your crypto here.
I don’t know about you, but I’d rather be the only person who can access my crypto.
Still, centralized exchanges represent the easiest way to convert your fiat into crypto. And thus, they act as a solid onboarding solution to get you into the crypto space.
If you are in North America, we recommend centralized exchanges like Coinbase or Kraken, as they are liquid and regulated. If you’re overseas, then Binance is also an option for you.
Today, I’ll be walking you through how to set up an account on Coinbase. The process will be fairly similar to the set up you’d need to do to use any centralized exchange. So, this guide should give a solid foundation even if you are interested in using a different exchange.
With that said, let’s get into setting up your Coinbase on-ramp.
Setting Up Your Coinbase Account
Before you can set up your account on Coinbase, you’ll need ...
- A government-issued photo ID. (Not a passport card; a full list of accepted IDs can be found here.)
- A computer or smartphone connected to the internet (we’d recommend using your computer).
- A phone number connected to your smartphone (you’ll receive SMS text messages as part of the set-up process).
- The latest version of your browser (Coinbase recommends Chrome). You can use the Coinbase app, but later this week, I’ll be moving on to talk about how to go from centralized exchanges to the decentralized space. That transition is easier on a web browser, so for ease and consistency, sticking to a web browser may be best.
If you have all that ready, you can get started.
Create Your Account & Verify Your Email
1. Go to the Coinbase site. Click or tap Get Started. Then, fill in the requested information ...
- Legal full name (needs to match your photo ID)
- Active email address
- A password that you’ll create (this will be your login password)
- Your state of residence (needs to match your photo ID)
2. Check the box next to the User Agreement and Privacy Policy and click Create Account if you agree.
3. Coinbase will then send you a verification email to your registered email address. Go to your inbox, open the email from Coinbase ([email protected]) and select Verify Email Address.
Clicking the link in the email will take you back to Coinbase.com.
4. You’ll need to sign back in using the email and password you recently entered to complete the email verification process.
Verify Your Phone Number
Now, you’ll need to verify your phone number as part of the two-factor authentication process. Once you’ve signed into Coinbase, you’ll be prompted to select your country of residence and your phone number. Fill those in and click Send Code.
Enter the seven-digit code Coinbase texted to your phone number on file and click Submit.
Add Your Personal Information
Enter the information shown on your valid government-issued photo ID — you’ll need to submit a photo of this ID in the next step. This includes:
- First Name
- Last Name
- Date of Birth
- Address
You’ll also need to answer a few security questions. Once you’re done, click Continue to finish the process.
Verify Your Identity
1. Go to the Document Verification prompt.
2. Select your preferred identity document type and upload method.
3. Follow the on-screen instructions then select Upload.
You’ll receive an email confirmation when the verification has been completed.
Link a Payment Method
This will be how you fund your account. Coinbase has a few options, as shown in the table below:
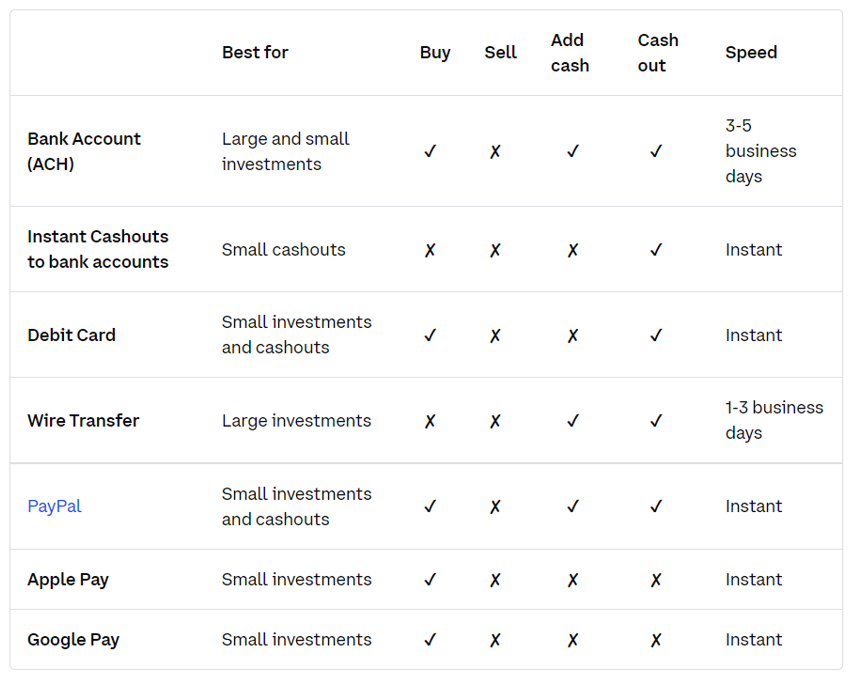
Note: These options are for U.S.-based customers. For others, please check here for what’s offered for your country.
Which payment method you choose is up to you. Once you’ve decided, here’s what to do ...
1. Go to Payment Methods.
2. Select Add a Payment Method.
3. Select the type of account you want to link and follow the instructions to complete verification depending on the type of account being linked.
For individual guides for each type of account, click here and scroll until you see the type you have chosen.
And that’s it! Once you’ve successfully added a payment method, you’re now able to buy crypto on Coinbase!
This may seem like a lot of work, but everything above was a one-time set up. Once you complete these steps, you’ll never have to do them again, and you can jump straight to ...
Buying Crypto on Coinbase
1. Sign in to Coinbase.
2. Select Buy / Sell on the upper right-hand side.
3. Click the Buy panel to select the asset you'd like to purchase.
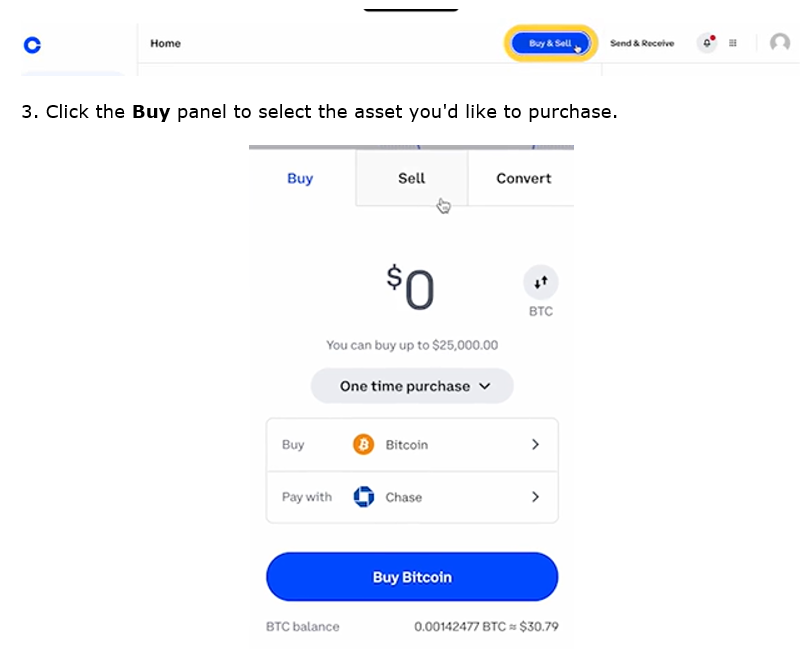
4. Enter the amount you'd like to buy denominated in crypto or your local currency. We’ll primarily be using the stablecoin USD Coin (USDC) for our purposes, so I recommend testing this process with a small purchase of that.
5. Select your payment method.
6. Click Preview Buy to confirm your purchase (you can always click the back arrow to make a change).
7. If the details are correct on the review page, click Buy to complete your purchase.
Now, you should be able to see your crypto balance on Coinbase.
Like I said, the process is fairly similar across centralized exchanges. Each exchange will also have FAQs on their site to walk you through the process.
No matter which exchange you need to use, however, we don’t recommend keeping your crypto on the exchange for security reasons.
So, what should you do?
Answer: Set up a self-custody wallet.
I’ll cover that tomorrow.
Best,
Beth Canova
Crypto Managing Editor
