 |
| By Beth Canova |
Ready to invest in crypto but not sure where to start?
If you’ve set up a traditional brokerage account (or even if you haven’t), you can set up a crypto account.
There will be a few extra steps. In exchange, you get two big opportunities.
First, to get in now before crypto adoption and therefore crypto prices go higher. And if you’ve been following along with our Weiss Crypto Daily analysis, you’ll know our crypto team anticipates a several macroeconomic factors to converge in early 2024 that should spark a new wave of adoption.
And second, to enjoy the privacy that trading digital currencies can offer.
Frankly, there is no better time to start to trade crypto. That’s why we’ve put together this guide, to show you exactly how to get started.
First, the basics. Yesterday, I walked you through setting up a centralized exchange account to turn your fiat into crypto.
Today, I’ll show you how to decrease your exposure to hacks and ensure that only you can access your crypto assets.
Crypto ownership and control boils down to three major components:
1. A public address. This is akin to a checking account number and refers to the place where the crypto resides on the blockchain.
2. A public key. This is essentially your proof of ownership over the public address. It takes the form of a unique series of letters and numbers. This series is tied to a private key. However, it doesn’t contain any information about the identity of the owner.
3. A private key. This is the most important piece. It’s like a password to an online banking account. It gives the holder complete control over the crypto in question.
These three items are essential for confirming and maintaining ownership of your own assets. You’ll also need them to successfully deposit those assets on decentralized finance applications, or dApps. (We’ll get to that in just a moment.)
Setting up your public address, public key and private key is as simple as setting up a MetaMask wallet.
What Is a Wallet?
Just like you can’t buy stocks without a brokerage account, you can’t trade crypto without a wallet.
Now, the wallet is where you deposit money, but that’s not where you trade. What the wallet does is give you is first access to the crypto universe. Much like the internet gives you access to the world wide web.
MetaMask is a software wallet — also called a soft wallet or hot wallet. Meaning, it’s connected to the internet, but it exists as a browser extension.
Not only does it provide the three keys to crypto ownership. But it also allows you to interact with various dApps. These include everything from decentralized exchanges to lending/borrowing platforms to metaverse games.
MetaMask is built on the Ethereum (ETH, “B+”) network and supports Ethereum-based tokens. That includes assets built on some Layer-2 networks such as Polygon (MATIC, “B”) and Arbitrum (ARB, Not Yet Rated).
Since Ethereum is the largest smart contract blockchain, a MetaMask wallet will allow you to access a large number of popular dApps. It also supports a number of smaller chains. You can find a full list here.
And if you’re interested in exploring deeper into DeFi, there are other soft wallets available, such as — such as Exodus, Guarda and Electrum, which all have different strengths and uses. The process to set them up should be similar to MetaMask.
So, without further ado, let’s get started.
How to Set up Your MetaMask Wallet
1. Download MetaMask by visiting the MetaMask website.
MetaMask can run as an extension on Google Chrome, Firefox, Brave, Microsoft Edge and Opera.
MetaMask should automatically ID which browser you’re using. Confirm it’s correct and click Add Extension.
2. Make sure MetaMask is pinned in the extension area of your browser — immediately to the right of the address bar.
To do this, click on the puzzle piece on the top right of your browser. In the dropdown menu, click on the pin next to MetaMask.
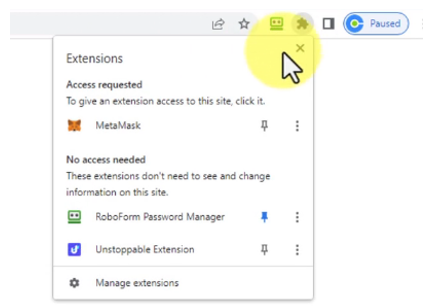
Now, the MetaMask fox icon will always be there. Any time you need to open your MetaMask app, all you need is to click on that icon.
3. Click Get Started. You’ll then be asked if you authorize MetaMask to collect data on how you use it. That choice is up to you.
4. Click on Create a Wallet. On the next screen, you will be asked to create a new password. You’ll need this password every time you click on the icon to open your wallet.
Agree to the terms and conditions and click Create.
5. After entering your password, MetaMask will generate and display a 12-word seed phrase unique to your account. These 12 random words serve as a backup fail-safe in case you cannot use your login for whatever reason.
Record a copy of this seed phrase — with the exact order and correct spelling of every word — because it allows you to retrieve your MetaMask wallet from anywhere in the world, even if you forget your password.
That said, avoid storing your seed phrase on anything that has access to the internet.
This includes screenshots and password-saving apps. If anyone steals your seed phrase, your MetaMask wallet and all the crypto stored on it becomes theirs.
I recommend you write your seed phrase down on a piece of paper and lock it away in a safe place.
Also note that no one should ever ask you for your seed phrase. If someone does, it’s likely a phishing scam.
6. Once you’ve written your seed phrase down, reenter it when prompted on the next page to confirm you have the words in the right order.
Once you’ve entered your seed phrase correctly, click Confirm.
Now, You’re Ready to
Transfer Your Digital Dollars to DeFi
Now, your MetaMask account should be up and running. That means it’s time to transfer any crypto you have in your centralized exchange to your wallet.
Yesterday, I used Coinbase (COIN) as my centralized exchange example, so I’ll continue that here.
1. Go back to Coinbase. Click Send/Receive at the top right of the page, next to the Buy/Sell button.
2. In the Send tab, change the asset to match what you wish to move from the CEX to your wallet and enter the amount you wish to send. You can change the denomination of the exchange from USD to the asset in question by toggling the button with the up and down arrows on the right of the tab.
If you’re looking to transfer your entire balance, you can click Select All to automatically put your full balance into the transaction.
If this is your first time transferring assets, I recommend doing a test run with a small amount. Because you can choose the dollar amount you invest in crypto, rather than having to spend upward of $2,500 on one Ethereum, you can commit only the amount you feel comfortable using at this time.
3. Go to your MetaMask wallet by clicking on the fox icon on your browser and copy your address. This will be at the top-center of your extension. Just right-click to copy.
4. Back on Coinbase, paste your MetaMask address in the To field.
Take a moment to make sure the address is pasted correctly and matches exactly. If there’s a typo and you confirm the transaction, you won’t be able to get your crypto back.
5. When ready, click Continue.
6. A pop-up will appear with the transaction details. The transaction network defaults to Ethereum. If you want to change the network, just click the network icon in the pop up to select another MetaMask-supported chain.
7. Review the details of the trade again to ensure the amount, asset, address for your wallet and network are all correct. When you’re confident everything is right, click Send Now.
8. In MetaMask, check to make sure your crypto is there. It may take a few minutes for the transaction to process.
And that’s it! You should have successfully moved your crypto from a centralized exchange — where technically the exchange owns your crypto — to a soft wallet where only you can access your assets.
This means you’ve reduced your exposure to any hacks or failures on centralized exchanges while still being able to benefit from the ease of use they offer.
And tomorrow, I’ll cover one additional step you can take to keep your crypto safe.
Best,
Beth Canova
Crypto Managing Editor
